
Next.js Authentication With AWS Amplify: A Comprehensive Guide
Next.js Authentication With AWS Amplify: A Comprehensive Guide
How to use Next.js user authentication with AWS Amplify? Explore how to implement authentication in Next.js using Amplify with code examples. Next.js is one of my favorite framework for building server-side rendered React applications. Amplify is a powerful set of tools and services provided by AWS (Amazon Web Services). Amplify simplifies the process of adding authentication to your applications. Let’s explore how can we use Next.js with AWS Amplify.
Introduction
Tired of wrestling with web app authentication? Want to introduce Amplify to your Next.js projects? You’re at the right place! In this comprehensive guide, we’ll integrate an authentication system into your Next.js applications using AWS Amplify. This step-by-step guide will help you add authentication flow in a very short time!
After reading this article, you will gain a deep understanding of how to implement and manage secure authentication in your Next.js applications using AWS Amplify. From setting up AWS Amplify to writing secure authentication codes.
Table Of Contents
-
Setting up Next.js and Amplify
-
Creating an Amplify Authentication Backend
-
Implementing User Sign In and Sign Up
-
Adding Social Login and Signup
-
Additional information on Signup
-
Protecting Routes with Authentication
-
Retrieving User Information
-
Handling Sign Out
-
Conclusion
Prerequisites:
Before we dive into the implementation, make sure you have the following prerequisites in place:
-
Basic understanding of Next.js and React
-
An AWS account with administrative access
-
Node.js and npm installed on your machine ( NVM tutorial link )
Setting up Next.js and Amplify
First, let’s set up a new Next.js project and configure Amplify. Open your terminal and run the following commands:
npx create-next-app nextjs-amplify
cd nextjs-amplify
This will create a new Next.js project in a directory named nextjs-amplify. Change into the project directory by running the second command.
Next, let’s install Amplify in our project by running the following command:
npm install aws-amplify @aws-amplify/ui-react
Now that Amplify and Amplify UI are installed, we need to configure it for our project.
After this step we need to have **AWS Account **to use Amplify.
Run the following command to initiate the Amplify configuration wizard:
npm install -g @aws-amplify/cli
amplify configure
Follow the prompts and provide the necessary information, such as your AWS profile and region.
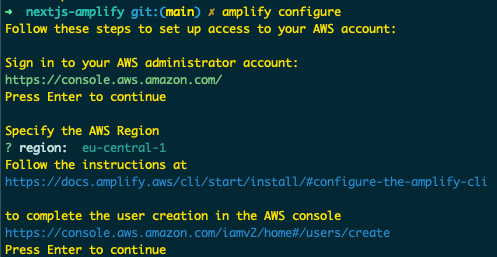
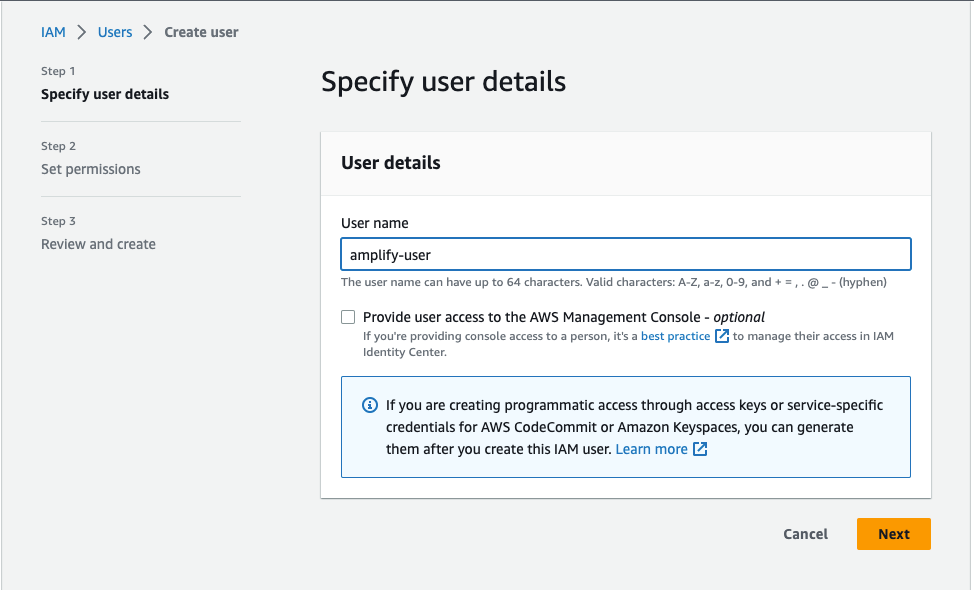
After you choose the region link will be open to add user details
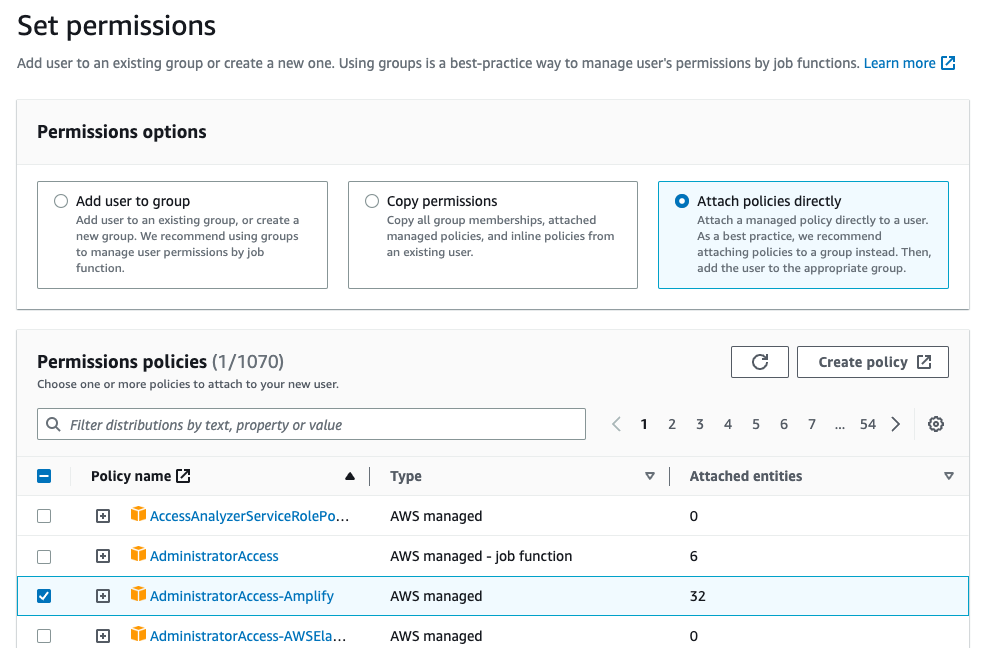
Then you can set permissions with adding user to group as below.
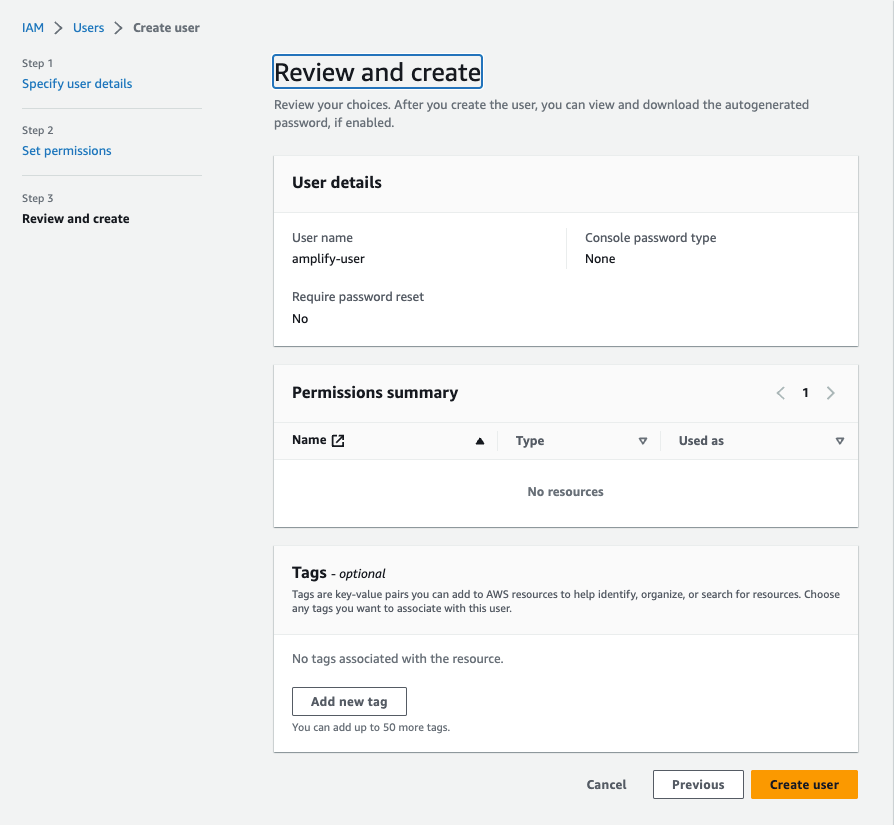
Then you can review and click create user as below.
Then you can continue on the CLI enter the
accessKeyId and secretAccessKey

Creating an Amplify Authentication Backend
To create an Amplify authentication backend, run the following command in your project directory:
npx amplify add auth
This command will launch the Amplify authentication configuration wizard. Follow the prompts to configure the authentication backend based on your application requirements. You can choose options like authentication type, sign-in methods, and more.
Once you have completed the configuration, run the following command to deploy the authentication backend:
amplify push
Amplify will provision the necessary AWS resources for authentication, such as Cognito user pools and identity pools.
Set up Amplify in Next.js
Now that our authentication backend is set up, let’s add amplify and amplify UI to our project.
Here you can go src/app/layout.tsx
import './globals.css'
import { Inter } from 'next/font/google'
import { Amplify } from "aws-amplify";
import awsExports from "../aws-exports";
import "@aws-amplify/ui-react/styles.css";
Amplify.configure({ ...awsExports, ssr: true });
const inter = Inter({ subsets: ['latin'] })
export const metadata = {
title: 'Create Next App',
description: 'Generated by create next app',
}
export default function RootLayout({
children,
}: {
children: React.ReactNode
}) {
return (
<html lang="en">
<body className={inter.className}>{children}</body>
</html>
)
}
Here we imported amplify and configured it with the awsExports file we get.
Now we can use <Authenticator> component or withAuthenticator higher order component to start using Amplify authentication in required pages.
Inside the app/page.tsx let’s add an Authenticator component.
import { Authenticator } from "@aws-amplify/ui-react";
export default function Home() {
return (
<Authenticator>
<main>
<h1>Hello</h1>
</main>
</Authenticator>
);
}
Our setup is now completed.
Implementing User Sign In and Sign Up
After our setup is completed we can continue creating Sign in and Sign up flows.
We can start our application with
npm run dev
Then when you go to localhost:3000 you should be seeing this screen. You can now create an account with an email and password and use it like that.
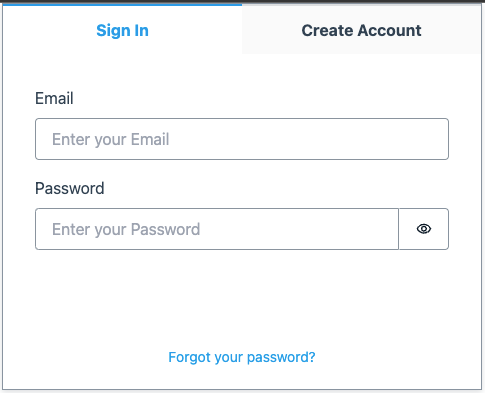
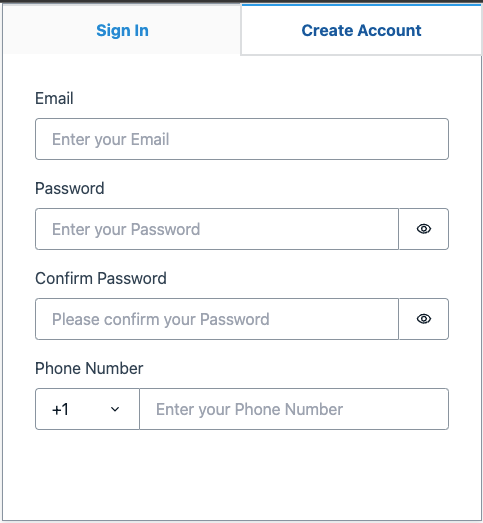
This component comes from @aws-amplify/ui-react if you select Create Account section you will see a screen as below.
Adding Social Login and Signup
Now lets have a look how can we implement social login and signup.
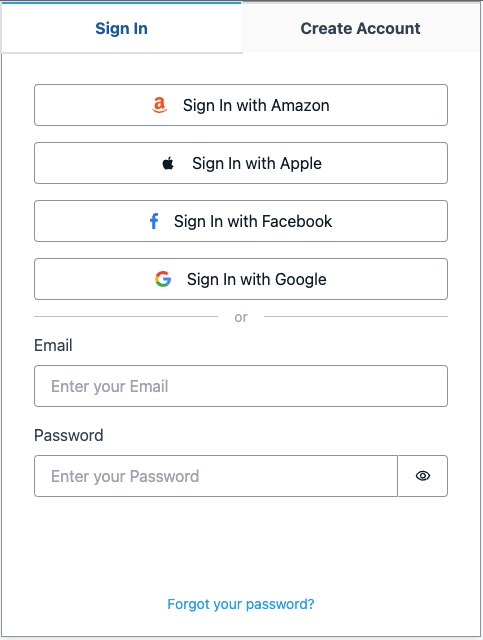
The supported options are amazon, apple, facebook, and google. Here’s an example of this:
import { Authenticator } from "@aws-amplify/ui-react";
export default function Home() {
return (
<Authenticator socialProviders={['amazon', 'apple', 'facebook', 'google']}>
...
</Authenticator>
);
}
The result will look like below
Additional Information Signup
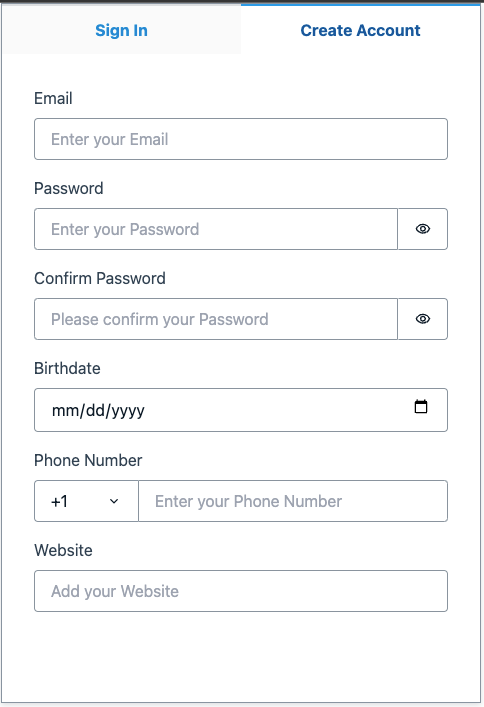
While user signing up to our application we can request more information from user.
The supported atributes are address, birthdate, email, family_name, gender, given_name, locale, middle_name, name, nickname, phone_number, picture, preferred_username, profile, updated_at, website, zoneinfo.
Let’s look at the example code about requesting these informations
import { Authenticator } from "@aws-amplify/ui-react";
export default function Home() {
return (
<Authenticator signUpAttributes={['email', 'address', 'birthdate', 'phone_number', 'website']}>
...
</Authenticator>
);
}
Protecting Routes with Authentication
When we add <Authenticator /> component in the Home page, this page will always require authentication. But how about other pages?
But some pages might be public in our application and some might be protected. How can we protect our routes with Amplify?
// pages/protected.jsx
import { withAuthenticator } from '@aws-amplify/ui-react';
const ProtectedAPI = () => {
// Handle authorized user logic
// ...
return (
<div>
<h1>Protected API Route</h1>
{/* Render the protected content */}
</div>
);
};
export default withAuthenticator(ProtectedAPI);
In the example above, we import the withAuthenticator higher-order component from @aws-amplify/ui-react to wrap our API route component. This ensures that only authenticated users can access the protected API route.
Within the ProtectedAPI component, you can implement your authorized user logic, such as fetching data from a database or performing specific operations. You can render the protected content or components based on the authenticated user's role or any other criteria.
If a user tries to access the /api/protected route without authentication, Amplify will redirect them to the sign-in page. Once the user successfully authenticates, they will be able to access the protected API route and view the protected content.
Retrieving User Information
When working with Next.js authentication and Amplify, you may need to retrieve user information for various purposes, such as displaying user-specific content or customizing the user experience. Amplify provides easy-to-use methods for retrieving user information within your Next.js application. Let’s explore how you can retrieve user information using Amplify.
To retrieve user information, you can leverage Amplify’s Auth module. Here's an example of how you can retrieve the currently authenticated user's information within a Next.js component:
import { useEffect, useState } from 'react';
import { Auth } from 'aws-amplify';
const Profile = () => {
const [user, setUser] = useState(null);
useEffect(() => {
const fetchUser = async () => {
try {
const currentUser = await Auth.currentAuthenticatedUser();
setUser(currentUser);
} catch (error) {
console.error('Error:', error);
}
};
fetchUser();
}, []);
if (!user) {
return <div>Loading...</div>;
}
return (
<div>
<h1>Welcome, {user.username}!</h1>
{/* Display user-specific content */}
</div>
);
};
export default Profile;
In the example above, we use the useState hook to manage the user state. Within the useEffect hook, we call the
const currentUser = await Auth.currentAuthenticatedUser();
method to retrieve the currently authenticated user. The retrieved user object contains various properties, such as username, email, and attributes, depending on the user's authentication provider.
By utilizing Amplify’s Auth module, you can easily retrieve user information within your Next.js components. This enables you to create personalized experiences, customize content, and provide relevant information based on the authenticated user.
Handling Sign Out
Implementing a sign-out functionality is essential when working with Next.js authentication and Amplify. It allows users to securely log out of your application. Amplify provides straightforward methods to handle sign out within your Next.js components. Let’s explore how you can implement sign out using Amplify.
To handle sign out, you can use the Auth module provided by Amplify. Here's an example of how you can implement sign out within a Next.js component:
import { Auth } from 'aws-amplify';
const SignOutButton = () => {
const handleSignOut = async () => {
try {
await Auth.signOut();
// Redirect or perform any other actions after sign out
} catch (error) {
console.error('Error:', error);
}
};
return (
<button onClick={handleSignOut}>Sign Out</button>
);
};
export default SignOutButton;
By calling Auth.signOut(), Amplify clears the user's authentication session and removes their session tokens. This ensures that the user is securely signed out and no longer has access to protected resources within your application.
Conclusion
In this comprehensive guide, we have explored Next.js authentication with Amplify, empowering you to enhance the security and user experience of your web applications. By leveraging the powerful capabilities of Next.js and the seamless authentication provided by AWS Amplify, you can create robust and user-friendly authentication flows.
With Amplify’s authentication features, you can easily secure your Next.js API routes, control access based on user authentication and roles, and provide a personalized user experience. The ability to retrieve user information and handle sign-out functionality further enhances the usability and customization options of your application.
Thank you for reading my in-depth guide on Next.js Authentication With AWS Amplify. I hope you found it informative and helpful in your web development journey.
I hope this article gives you a good understanding of how to use amplify with nextjs. I wish you enjoyed reading it! 🚀
If you have an idea about creating a startup you can contact me via futuromy.com
I can help you validate your startup idea and build it!
If you found this article helpful, you can access similar ones by signing up for a Medium membership using my referral link.
Follow me on Twitter
Subsribe my channel in Youtube!
Happy Coding!
Melih
Ready to get started?
At Futuromy, we believe in the power of gathering ideas and thoughts on paper and lists to drive successful web development projects. Our team of skilled professionals is passionate about taking those ideas and turning them into amazing, ready-to-use products that our users will love. From the initial design phase to the final implementation, we use the latest tools and techniques to bring your vision to life. Contact us today to learn more about how Futuromy can help turn your web development ideas into a reality
Contact Us